Stubbie Roll Up Rocket Drill
By Alan Roark, Vault Coach, Amherst Steele H S, Amherst, Ohio
Here’s another “Roark Original” plastic pipe drill. The purpose of this drill is to learn to swing up into an inverted position and be able to hold it while being lifted upward. The vaulter learns to be able to hold their position while balancing in all three dimensions. This one is a goodie.
Here’s the stuff to buy to make the “Roll Up Rocket”
42” section of 1 1/4” schedule 40 pvc pipe. (1” pipe isn’t strong enough) (Lowes sells 48” sections)
2” piece of 1 1/4” plastic pipe (drill spacer)
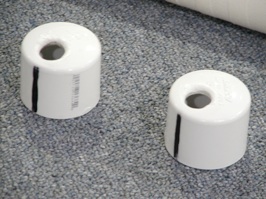
Two 1 1/4” plastic pipe end caps
5/8” spade bit and drill
8’ 6” of 5/8” braided rope (Lowe’s has the best color selection. Home Depot just has black. 32¢/ft.)
First, cut a section of pipe to 42”. Next, cut a 2” spacer piece from the scrap, and put the 2” piece of pipe (drill spacer) into an end cap. Drill a 5/8” hole from the inside to the outside of the cap using a drill and a 5/8” spade bit. Offset the hole as far to the side as you can. The spacer will line up the hole correctly. Drill both caps. Next, round over the outside edges of the holes so they don’t cut the rope. (I used a 1/4” round over router bit in my drill and just lightly pressed it in the hole and it rounded over nicely. You can use sand paper if you don’t have the router bit.) Remove the spacer. Put line-up marks on the caps near the holes. (The holes are offset so that the weight of the vaulter is supported by the rope going through the entire length of the pipe and not just at the end caps.) This will make sense later.
Melt each end of the rope with a lighter or a stove, and use a folded piece of cardboard to shape the soft ends of the rope into a point. (DO NOT let the hot, melted, ends of the rope touch your skin. The plastic will stick to you until it’s cool enough to scrape off. Ouch)
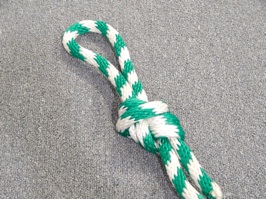
Fold over 48” of the rope and tie a “figure 8” loop knot in the end making a good sized loop that is big enough to be able to put your hand through.
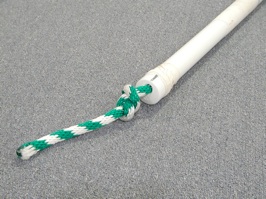
Thread the other end of the rope through the outside of an end cap, through the pipe, and through the inside of the other end cap. Press the end caps onto the ends of the pipe and tie a “figure 8 keeper” knot in the end of the rope and work the knot down snug against the end cap. Make sure both of the end cap line-up marks are on the same side of the pipe.
I marked and taped my pipe just like I do all of my pipe stubbies. (See “Pole Grip Spacing” Drill, Sept. ’03) This makes it consistent with other drills we do.

Set up the marks near the bottom end as in the picture below. (The end cap line-up marks are on one side of the pipe and the handhold marks are on the other side of the pipe. This makes the rope run inside the top of the pipe when the drill is being done giving maximum support for the pipe.)
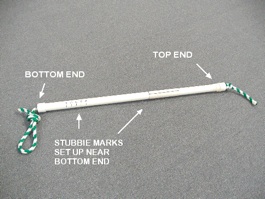
Wrap tape around the bottom of the top end cap to protect the hands of the person doing the lifting on that end. (This will be obvious after the first time you do the drill.) (The loop end is the bottom end and the knot end is the top end)
Now, you’re good to go.
Here’s how the drill works:
First, get good at the “Stubbie Roll Up Drill” from last month. It’s the base for this drill.
Next, have two spotters stand at the sides of the vaulter. The loop end will be on the left (bottom hand) and the knot end will be on the right (top hand) for a right-handed vaulter.
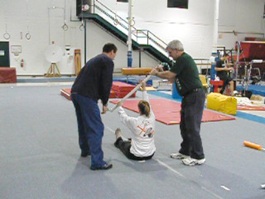
As the vaulter rolls back and lowers their front hand, the left side spotter move his hand down and back with the bottom of the pole while the right side spotter moves down and back with the movement of the top of the pole, both getting ready to lift.
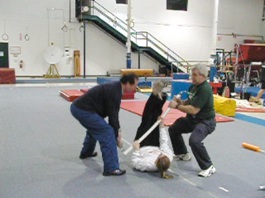
As soon as the vaulter’s legs and hips go up, the spotters both lift straight up. The vaulter now has to balance their legs and hips above their shoulders and keep the pole close to their legs to be able to rise with the pole and not get dumped off.
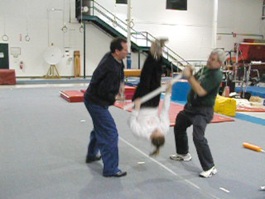
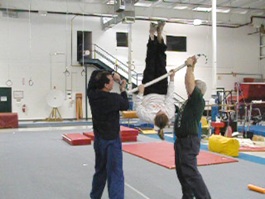
The spotters continue to lift the vaulter as high as they can so the vaulter feels the forces and has to balance themselves for about four feet of lift. (At the top of the drill, the vaulters simply lets themselves down to a standing position.) (It’s tough on the spotters’ shoulders to lower them down.)
This is a great drill to teach your vaulters how to swing up to an inverted position and hold it while being lifted by the pole.
The video below shows how the drill flows.
A great addition to this drill is what we call “Roll Up Rocket Travelers”. After you get good at “Roll Up Rockets”, have the two spotters walk forward for about ten feet so the vaulter can learn to balance while moving forward toward the bar. Watch the video below the see how it works. If you get really good at it, you can lift and travel at the same time.
The next step is to have them do the drill with their eyes closed so it’s totally sensory feel of the balance. This really makes it set in deeper for them.
Notes:
--As the spotters and vaulters get the timing worked out, the drill gets smoother and smoother and simulates the inversion and rise of the vault really well.
--The faster and smoother the vaulter swings up, the more they create and the easier it is for the spotters to pick them up. (Even vaulters that weigh 170lbs.)
--The spotters have to learn to wait for the vaulter to roll up onto their shoulder before lifting.
--Both spotter need to lift at the same rate.
--The vaulter has to let their shoulders roll under their hips to be able to remain balanced.
--The left side spotter puts his hand trough the loop and holds onto the knot or just above the knot
--The left side spotter can wear a glove to protect their hand from the rope if you do a lot of lifts.
--Pay attention to accurate positions.