Floor Slide Drill
By Alan Roark, Vault Coach, Amherst Steele H.S., Amherst, Ohio
This one is a lot of fun. The purpose of this drill is to teach the sequence and balance of the pull turn during the invert thru release phase of the vault.
Here’s the equipment:
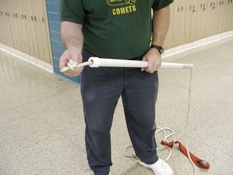
3 1/2’ plastic pipe stubbie (1” PVC pipe)
End cap with a 3/4” hole drilled in it
20’ of 1/2” or 5/8” rope
Strap loop for your hand
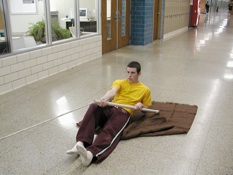
3’ x 5’ piece of burlap (fabric store)
A smooth floor to slide on
Thread the end of the rope through the top of the stubbie and through the end cap, tie a knot (figure 8 keeper) in the end of the rope and put the cap on the bottom end of the stubbie. Tie (sheet bend knot) the strap loop on the other end of the rope and you’re ready to go.
Here’s the drill:
Have your vaulter sit on the burlap on the floor in a swing up position ready to do the pull turn. Make sure the left leg is straight, the right arm is straight with their hand inside their right knee, the left elbow is inside the pole, and they have an open angle at the waist.
Hold the strap end of the rope and start moving down the hall.
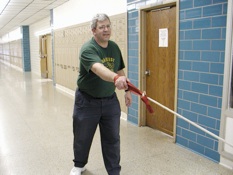
Your vaulter can now start to lean back and roll to their left side while pulling the pole up past their face while turning to their stomach, then pushing away from the top of the pole. After a little practice for both of you, you should be able to time it up pretty well. (see the video below)
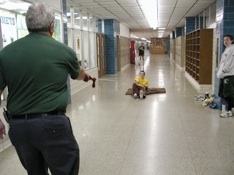
Some variations to the drill are to have them hold different positions while you pull them. The toughest one is with them laying on their stomach with the pole pushed away from them while you pull them down the hall trying to keep their feet in line with the rope.
This can really work on their ability to balance themselves on the way up and over the bar. (To make things work a little better we spray furniture polish on the bottom of the burlap. Don’t spray it on the floor, just on the burlap or you might lose some kids during class change the next day!)
After the two of you get used to how it works, you can speed things up quite a bit. Have fun.